 |
| Wilcom Cross Stitch Software explained |
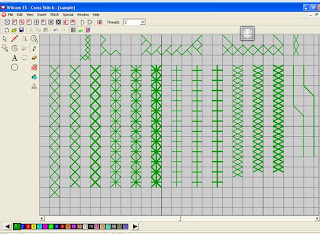
I think I know the Wilcom embroidery software for cross stitch pretty thoroughly now, not that there is too much to learn... You can choose the no. of strands you want to work with like 2, 4 or 6. (See the drop box at the top right where I have selected 2). You can also set the no. of crosses you would like in an inch which decides how close or far apart your crosses will be. I find that 6 strands works well for me if I have 10 crosses per inch.
You basically need to use the pencil tool to mark your crosses the kind which you can select from the row below the menu bar. You also have the eraser tool to wipe out any mistakes. Besides, you also have the undo and redo buttons like in most software today.
You can draw circles or ellipses with the circle tool and with the lettering tool just typing in the alphabets converts it into cross stitch for you. I have tried most of the different kinds of stitches available in the image above and some of them in all options of 2/4/6 strands.
You can mark a particular rectangular area of a design with the select tool and copy-paste it. But if you need to mark an irregular area too, it is possible using the polygon select. You just mark at points around the chosen area and enter when you finish and you have the area selected. These are probably common to most software. When you use the Auto select tool and click on a cross, it selects all the crosses contiguous to it; you can then change the color, the no. of strands or whatever you wish or even copy it for replication.
You either copy paste or use the stamping tool (the last icon on the tool bar on the left) to replicate that part of the design to any position you like. You can also rotate a selection (clock-wise through an angle of 90) or mirror image it horizontally or vertically as you choose. You can select an area and have it bordered with crosses or just a simple outline (see the outline you can use in the extreme right of the image above). You also have the cross stitch run and the cross stitch fill, once you click the mouse at the points that will border the line or area and finish with an enter the line/area gets filled with crosses. My eight year old niece loves to play with it and she has fed in a few designs though I haven't sewn them out yet. It IS child's play once you get the hang of it.
It makes work a lot easier and your design should be ready in no time at all.


Download AVG Retail via visiting Read More.. is suitable with all the devices, such as windows , laptops and smartphones. Visit now at avg retail and install AVG for your device. To download avg with license number on your laptop, you must create an AVG account at AVG my account by visiting avg registration page.
ReplyDelete
ReplyDeleteTrying to activate youtube using Youtube.com/activate Facing issues? Dont worry, our experts at Youtube.com/activate are here to help you with the entire process. If you want to view YouTube videos using your Smart TV you will notice that you will have to sign in and activate your account first.
We have identified the list of available devices for Amazon Prime Video; we can also check out the step by step to activate Primevideo.com/mytv on your smart TV. We only need a prime video activation code for the activation method. You can create the activation code on your device with the occasional help of Prime Video application. With this information handy, you can get a unique code and initiate their devices in less than one minute.
ReplyDeleteRead more…